


The Elite-Pi is a microcontroller (sometimes referred to as MCU for “microcontroller unit”) which is a small computer on a single integrated circuit chip. Think about big-brain knowledge condensed into something small for a specific purpose. The specific purpose is to make keyboards awesome!
This model is not the first in the Keebio store: the Pro Micro and Elite-C came before it. However, the Elite-Pi has some great advantages over its predecessors.
Advantages of the Elite-Pi
The predecessors had their time, but it is now time for the Elite-Pi! I mean, who wouldn’t want pie every day? I digress.
More Memory
You can bring in lots of QMK features with no sweat. There's lots of room for anything you may need.
Price
The type of microcontroller that the Elite-Pi is will empower you to buy it for a lower cost.
Flashing
No need to use the QMK Toolbox, just bring in a copy of a compiled .uf2 file to the Elite-Pi to update its firmware.
Pinout

How do I use this?
QMK Firmware
You first need to get started with the firmware build. If you try to just change a .hex to .uf2 by renaming it or repurposing something meant for a different chip, it won’t work.
Go ahead and use the converter for the Elite-Pi. The converter is needed because it helps QMK map the pins so they route info to where it should go. Hit up this page for the instructions: QMK converter usage.
However, if you are making a keyboard DIY, you can use it as a RP2040 board like so here: QMK - RP2040 Info.
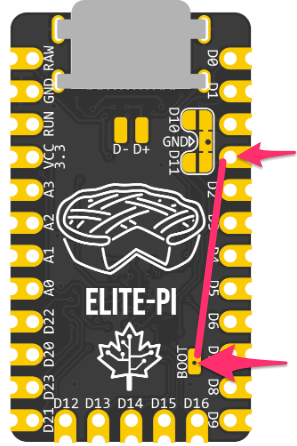
What about footwear? Boot?
You get two buttons for Run/Reset and Boot. The left is for your Boot and the right is for Run. You'll want to get your Elite-Pi into bootloader mode, so take a look at the directions below for that.
We have plans for reducing the Elite-Pi to have just one button to perform Run and Boot. Nifty! Be on the lookout for that development.
Blinded by the Light
Flashing the Elite-Pi is here: QMK Documentation in the Flashing Section.
But if it's easier for you, here's what you need to do here:
- Enter bootloader mode (use one of the following methods):
- For a new Elite-Pi out of the packaging, it will already start in bootloader mode when plugged into the computer
- Double-tap the Run/Reset button (if flashed and was compiled with
RP2040_BOOTLOADER_DOUBLE_TAP_RESEToption)- If you used the converter mentioned above, it will have this option enabled
- Hold the
Bootbutton (the left button) down, press the Run button (the right button), and release both buttons - Hold the
Bootbutton (the left button) down, while pluging in the USB-C cable - Press the
QK_BOOTkeycode (if present on a flashed keyboard)
- Wait for OS to detect the Elite-Pi
- It will show up as a USB mass-storage device named
RPI-RP2
- It will show up as a USB mass-storage device named
- Copy the
.uf2file to theRPI-RP2USB drive
If you have the Elite-Pi installed with the back facing towards you, and you need to press Boot, take a wire and connect the Boot pad on the back and a GND pad, as shown below:
One application note!
The Elite-Pi plays nicely with other Elite-Pi. It's not possible to use a Pro Micro on one half of a split keyboard and an Elite-Pi on the other half. They're not built to do this due to different voltage levels and communication protocols.
However, if you'd like a different RP2040 controller to go along with your Elite-Pi, that can be done!
Be sure to check out the official Elite-Pi Usage Guide! It has even more details than I wrote about here.

Member discussion